 I’m using the Tamiya kit to model a specific aircraft, again. This is going to be a Republic P-47D-22-RE Thunderbolt, on the complement of 135 Squadron RAF in Burma from April to May 1945. Its American serial number was 42-25818, with a British serial of HB981. It was what the RAF called a “Thunderbolt I”—what’s commonly referred to as a “razorback”, to distinguish it from the later “bubbletop” models, which the RAF designated the “Thunderbolt II”.
It met its end at Akyab airfield, damaged beyond repair, on 2 May 1945, when it lost power on take-off, crashing and ground-looping some distance beyond the end of the runway. The squadron Operation Record Book has a laconic record of the event:

I’ll fill in a bit more detail as we go along.
The Tamiya kit is nominally a P-47D-20, but includes the parts I needed to make the one big change necessary to turn it into a P-47D-22 version—a larger propeller. The RE code indicates that my aeroplane was built at the factory in Farmingdale, Long Island, which fitted Hamilton Standard propellers to their block 22 aircraft. Despite the fact it’s not called for in the kit assembly instructions, a Hamilton propeller is actually included on the kit sprue, with appropriate maker’s marks on the decal sheet, too.
This is my first Tamiya kit, and I have to say I’m seriously impressed. Coming to it after my recent forays into ancient Revell, Airfix and Lindberg toolings, it’s a joy to work with parts that just fit together properly, and mouldings that place the gates in sensible places (rather than slap in the middle of a complicated and highly visible surface).
I added a couple of photoetched sets from Eduard—their P-47D-20 detailing kit, and their P-47D placards. There’s a bit of overlap between these two sets, but they each included something I wanted. I also needed to track down a 1/48 scale Sutton harness—the RAF reportedly (though there’s some debate) replaced the American-style harness in American aircraft with their own standard type. I settled on a “fabric” version from HGW Models, which looked promising but caused me a fair number of problems.
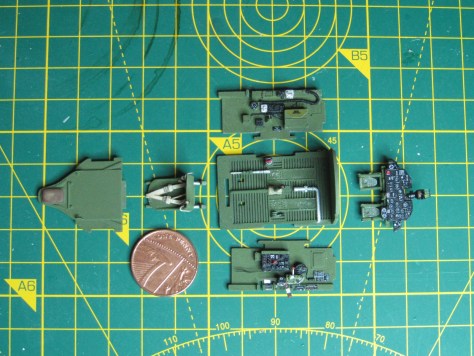
The Tamiya cockpit is nicely detailed, and fits together perfectly. I slightly vandalized it by accidentally setting my airbrush at too high an operating pressure for my Alclad primer, lending the surfaces a slightly pebble-dashed appearance that shows up rather too well in the detailed photos that follow, particularly the bright metal areas. Trying to strip off a laquer layer seemed like too dangerous an enterprise, and the result will anyway be much less visible inside the assembled cockpit, when the light necessarily comes from within a pretty narrow angle to the viewing direction.
I added the Eduard cockpit placards and instrument panel, and a selection of levers and nobs. The HGW harness seems to be made of some sort of stretchy neoprene, admirably detailed, and supposedly thin enough to thread through the various photoetched buckles provided. It comes on a white backing paper. When I tried to remove this, a couple of straps separated into sections; when I tried leaving it in place, it proved too thick to thread through the buckles properly. Eventually I used parts of two harness sets to produce one slightly bodged final result.


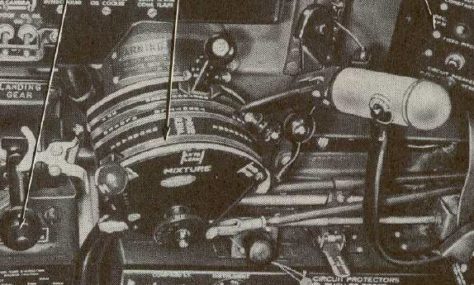
I made one modification to the Eduard detail—revising the throttle lever with a couple of plastic strips to produce the brown-and-white object that looks a little like an ice-lolly sticking up from the left side of the cockpit. I’m not entirely sure about this. The P-47 throttle lever went through at least three iterations during production, shown below in details taken from various pilot’s manuals.


The reference works I have are inconsistent with each other, and the manuals sometimes show more than one style of quadrant. Eventually I made a “best guess” to model the middle illustration above, with a large vertical throttle handle supporting a water-injection switch on its top.
Next, the engine. The Hurricanes I’ve been modelling had their engines decently concealed, but the Thunderbolt had a fair part of its complicated air-cooled radial engine on display. The Tamiya kit provides parts for the front half of the engine (all that’s visible in an intact aircraft), to which I added a photoetched ignition harness from the Eduard detailing set. Here it is, during a trial fit, which also demonstrates the lovely moulding Tamiya produces:

It’s a challenging object, comprising 36 cables, each of which has to be connected to the front or back of one of the Pratt & Whitney R-2800’s eighteen cylinders.
That came after painting, weathering and detailing the kit engine. Here’s the final assembly, with ignition harness in place:


Notice the tiny Pratt & Whitney eagle logo on the front, provided by Eduard.
Then it was a matter of masking and priming the aircraft fuselage. I put the undercarriage covers in place with Blu Tack, to mask the wheel wells and prepare them for the underside paint. The cowling has a nice locating mechanism that means it’s easy to paint it separately and put it in place later. I’m also modelling this aircraft with flaps down, so they’re being primed and painted separately.


The white primer is chosen because this aircraft sported SEAC stripes—white identification markings on cowling, wings and tail adopted within the South East Asia Command area in 1945. I’ve left my primer a little thin—I didn’t want to layer the stuff on and obscure detail, and any slight variation in the lightness of the overlying paintwork will be compatible with the weathered appearance that’s evident in photographs. I’ve also sprayed the area of the SEAC stripes with a final coat of matt white, which I’ll then mask to protect it from the application of later camouflage paint. That’s a reversal of the order in which this paint would actually have been applied, but again I want to preserve surface detail by avoiding having to apply multiple layers of white on top of dark camouflage colours.
 There’s a bit of a problem with the SEAC stripes for this aeroplane. According to Geoff Thomas’s excellent reference book Royal Air Force Thunderbolts, HB981 was part of a batch delivered between 12 March and 12 May 1944. But it doesn’t appear in 135 Squadron’s Operations Record until 4 April 1945, despite the fact that from the end of the previous year they were operating other HB and HD aircraft delivered in the same time frame. Where had HB981 been prior to its arrival at 135 Squadron? Maybe with another squadron, or perhaps in store, ready to be dispensed as a replacement aircraft. James J. Halley’s history of the H* serials doesn’t list HB981 anywhere else but with 135 Sq., but there are often gaps in the record.
 Why is any of this relevant to the SEAC stripes? Because they were first used at the very end of 1944, when the original Instruction stipulated that stripes should span the whole chord of the vertical and horizontal stabilizers. After a protest that this extra layer of paint might interfere with the operation of the control surfaces, a new Instruction was issued in March 1945, stating that the tail stripes should not impinge on the rudder or elevators.

Full-chord SEAC stripes
If HB981 had come straight from storage, it would have been painted up with the later pattern of SEAC stripes; but if it had been in operation earlier in the year, it might still sport the full-chord stripes on its tail. (Thomas says that some aircraft had their tail markings stripped and reapplied, but there are plenty of photographs showing full-chord stripes still in place, right up to the end of the war.)

79 Sq. RAF, Meiktila, July 1945. NV-B (third from right) still sports the full-chord SEAC tail stripe. (Photo R.C.B. Ashworth)
So, in the absence of contrary evidence, I decided to give HB981 the later pattern of stripes. I masked off the relevant areas, and then applied another thin layer of white around the edges of the masks, to try to ensure that the subsequent layers of camouflage paint don’t leak into the white areas.

And that’s where I’ll pick up this build log, next time.
or

I will eventually return to my forgotten hobby…